Visomino is a contraction of Visual Polyominoes, where Polyominoes are the set of objects that can be formed by adjoining adjacent squares. Polyominoes is a generic term used to refer to the collection of N-square objects. For N=1 to 5 the terms used are Monominoes, Dominoes, Trominoes, Tetrominoes, and Pentominoes.
This program enables you to solve various problems of arranging a selection of Polyominoes into various shapes.
It was written principally in response to reading D. E. Knuth's excellent article on Dancing Links. Therein, Knuth describes an efficient algorithm for solving general-purpose backtracking problems using Polyominoes as one of several examples.
Selecting Pieces
When you first run the program (or subsequently, upon selecting the item Polyominoes... from the New menu), the program displays a dialog box allowing you to choose the grid size and which pieces you'd like to use to fill the grid. The grid size may be changed after this selection, however the pieces from which you may choose for this grid are fixed at the time of this selection.
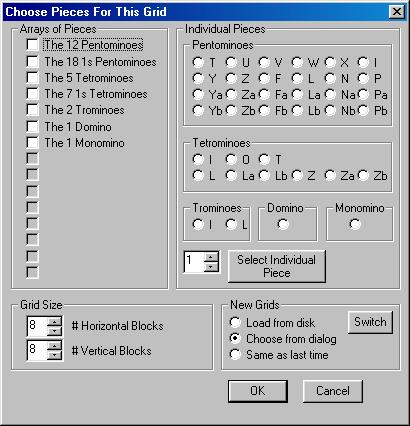
The left-hand group (Arrays of Pieces) displays the selected arrays for this grid - you may have several arrays chosen for any single grid. The right-hand group (Individual Pieces) displays the many single pieces, which may be used to fill the grid. To include an Individual Piece in the choices, select the piece (e.g., the O-Tetromino), then select how many copies of that piece you want, and finally press the button Select Individual Piece.
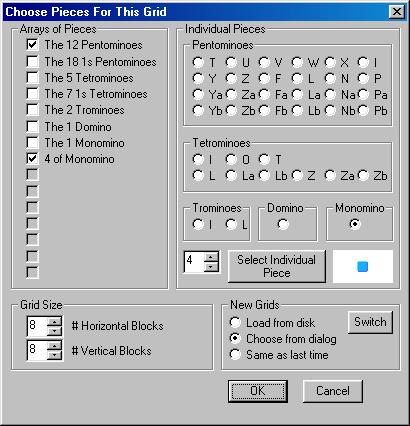
For example, if you want to solve the problem of how many ways can the 12 Pentominoes and a four Monominoes fill an 8x8 square, select the entry "The 12 Pentominoes" from the Arrays of Pieces and a Monomino from the Individual Pieces group. After selecting the Monomino, specify its count (of four) by clicking on the Up-Down control next to the Select Individual Piece button). Then, don't forget to click on the Select Individual Piece button to place that Individual Piece into the Arrays of Pieces group as follows:
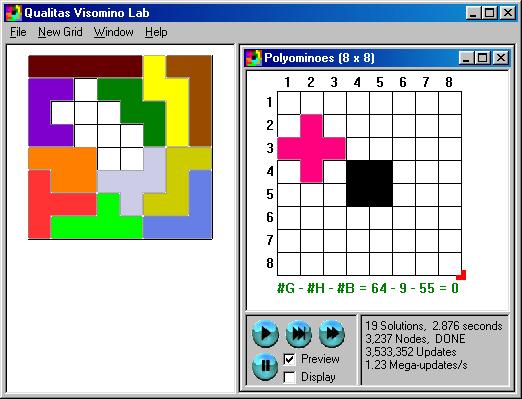
After selecting all the Arrays of Pieces and Individual Pieces to be used with a particular grid, press the OK button to display the Piece Window (on the left) and a Grid Window (on the right) as follows:
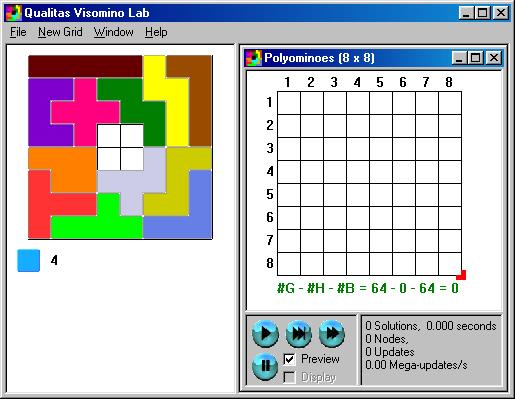
Note that several Piece and Grid Windows may be active at any one time, although only one Piece Window is visible. To show another Piece Window, select the matching Grid Window by clicking inside the Grid Window or on its title bar.
Filling the Grid
Although the grid starts out as rectangular, many other shapes can be created simply by deleting squares from the grid. Deleted squares are shown in black. To toggle the available/deleted state of a square, double-click on it; this changes the square from clear (available) to filled (deleted) or vice versa. To create a larger area of (say) deleted squares, click and drag an already deleted (black) square through the grid. This technique of dragging a square through the grid works for available (white) squares, as well, in order to remove the effect of deleting a square.
For example, if you want to solve the problem of placing the 12 Pentominoes into two separate 5x6 rectangles, create a grid of size 11x6 and delete the middle column of squares, as in
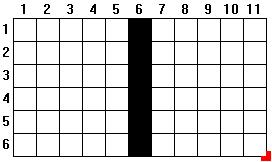
To delete the middle column of squares, double-click on the square in row 1, column 6. Then, click and drag that (now black) square straight down to row 6.
In the same manner, more complex figures can be created as follows:
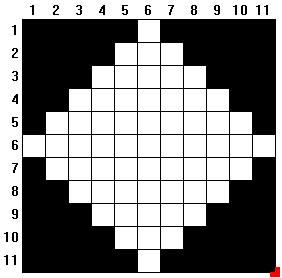
This figure can be filled with the twelve Pentominoes and a Monomino (in 10 unique ways).
To fix a piece into the grid, click and drag it from the Piece Window to the Grid Window. When this operation succeeds, the selected piece is deleted from the Piece Window and appears in the grid. When one or more pieces are fixed into the grid, the algorithm finds only those solutions with the fixed pieces in the designated positions.
To change the orientation of a fixed piece, use one of the following two methods:
- Press and hold the Shift key, and move the mouse over a piece. Note that the mouse cursor changes to a rotation symbol. Each time you left-click on the piece, it rotates by 90 degrees. If you press and hold the Ctrl key instead of the Shift key, the mouse cursor changes to a flip symbol. In this case, each time you left-click on a piece it flips around the minor diagonal. Note that one-sided pieces cannot be flipped.
- Right-click on a piece and choose the appropriate menu item.
To move a fixed piece to a new position, left-click and drag it.
To remove a fixed piece from the grid, left-click and drag it outside the grid boundaries -- it automatically returns to the Piece Window.
To change the size of the grid, grab the Grid Sizing Handle (the small red block at the grid's lower right corner) and drag it to the desired size.
The equation just below the grid indicates the number of Grid squares (#G), minus the number of Holes in the grid - black squares (#H), and minus the number of Blocks in the pieces (#B). When this number is zero, the pieces in the Piece Window exactly cover the grid and you are ready to run the algorithm.
Eliminating Symmetric Solutions
Limiting the placement range of a piece can eliminate some types of symmetric (horizontal, vertical, and diagonal) solutions. To do this, temporarily fix a piece into the grid by dragging it from the Piece Window. With a fixed piece in place, hold down the Alt key and select the fixed piece. While still holding down the left mouse button, you may release the Alt key. Next, drag the fixed piece throughout the entire range of positions to which it is limited. While dragging the fixed piece, you will see the squares underneath it filled with a diamond marker. To end this operation, release the fixed piece - it is automatically removed from the grid. When you run the algorithm, the squares in the selected piece will be limited to those positions.
The diamond markers may be edited by double clicking on them or by left clicking and dragging them onto other squares (or by dragging other squares onto them). Only one piece per grid may have its range limited.
For example, to find all 2,339 ways to fill a 6x10 rectangle with the twelve Pentominoes, limit the range of the X Pentomino to a quadrant as follows:

Note that in many cases, in order to eliminate all symmetric solutions some care must be taken. For example, in the diamond-shaped grid above which is filled with the twelve Pentominoes and a single Monomino, several different configurations must be run through the algorithm and each solution count divided by the respective symmetry number.
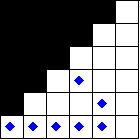
Using the Monomino as the range limited piece, there are three distinct configurations (here we show just the upper left quadrant):
 |
 |
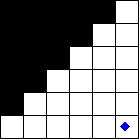 |
The squares in the first diagram are all asymmetric, so their symmetry number is one. The squares in the second diagram each have a single symmetry, so their symmetry number is two, and the square in the third diagram has all three forms of symmetry, so its symmetry number is eight. Given that the number of solutions for the three diagrams are 2, 16, and 0 respectively, dividing by their respective symmetry number (1, 2, and 8) and then summing, yields 10 unique solutions.
Loading and Saving Grids
The Grid and matching Piece Windows may be saved to disk and reloaded later by selecting the Save Grid... and Load Grid... choices from the File menu. Although the file saved to disk is a readable text file, its format is subject to change. The default extension is ".GRD".
In the Load Grid... selection window, multiple files may be selected at once in the usual way by selecting each file with the Ctrl-key pressed, or by selecting a range of files with the Shift-key pressed.
Running the Algorithm
To start the algorithm, press the Play button
![]() .
When this happens, the algorithm searches for solutions and displays
its progress in the Status Window (on the right) where it counts the
number of solutions found so far, the number of seconds the algorithm
has been running, the number of Nodes and Updates, and the number of
Mega-updates per second. The latter three values pertain to Knuth's
Dancing Links (DLX) algorithm and are described in more detail in his
article.
.
When this happens, the algorithm searches for solutions and displays
its progress in the Status Window (on the right) where it counts the
number of solutions found so far, the number of seconds the algorithm
has been running, the number of Nodes and Updates, and the number of
Mega-updates per second. The latter three values pertain to Knuth's
Dancing Links (DLX) algorithm and are described in more detail in his
article.
While the algorithm is running, you may
- toggle previewing of solutions as they are found by checking/unchecking the Preview Solution checkbox

- pause the algorithm by pressing the Pause button

- stop the algorithm by pressing the Stop button
 (which replaces the Play button when the algorithm is running).
While the algorithm is paused, you may
- proceed one solution at a time, by pressing the Forward button

- continue without pausing at each solution, by pressing either the Fast Forward
 or Pause button
.
or Pause button
.
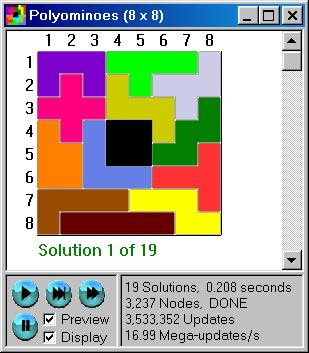
Displaying Solutions
When the algorithm has finished (either it's done or stopped), if there
were any solutions found, they are available for perusal. As the following
graphic shows, the Grid Window now contains a scrollbar that can be
used to scroll through the solutions. The particular solution number
is shown below the grid. To return to running the algorithm as well
as managing the grid (moving pieces around, resizing, etc.), uncheck
the Display checkbox
(![]() ).
To again review the solutions, check the Display checkbox
(
).
To again review the solutions, check the Display checkbox
(![]() ).
).
Running the Program
The program can also be run by calling it with an argument on the command line in which case the text on the command line is interpreted as the name of a grid file as in
visomino diamond.grd
Only one filename at a time is allowed on the command line.
Future Work
No programming project is ever finished, and this one is no exception. In no particular order, my wish list contains the following items:
- Save solutions to disk (in text and/or bitmap form) for sorting, analysis, and redisplay
- Allow other pieces such as Polyiamonds and Polysticks
- Allow user-defined pieces (disconnected, too)
- Allow toroidial grids
- Automatically eliminate all symmetric solutions
- Optimize DLX algorithm when using multiple Individual Pieces (e.g., 45 Y-Pentominoes filling a 15x15 square)
If you have additional suggestions or other feedback (or encouragement!), please contact the author. I would very much appreciate your feedback as to what (if any) future work should be done.
Author & Copyright
This program was written by and is © 2002 Sudley Place Software (Description, Download). It is free for non-commercial use; commercial use requires written permission from the author. It may be freely distributed as long as no part of the program or its documentation is altered and the program and its documentation are kept together.


